Sunday, January 29, 2012

Weekly Dinner Calendar

So yesterday I spent some time doing different crafts, mostly my ideas were from Pinterest.  One of the things that I decided to make is an erasable dinner calendar.  All it is-- a picture frame, scrapbook/decorative paper, scrapbook or any letter stickers that you have, and a wet erase marker.  (I got "Vis-a-Vis" expo wet erase... they're with the dry erase, but they're like markers for overhead projections etc)

So here it is before I wrote our menu.  The writing here's just the stickers on scrapbook paper beneath the frame.

This isn't a great shot of it, but here's the finished product.  It looks hard to read in this picture, but it's really not in person.  When you want to erase it, just use a wet rag or paper towel and clean it off.  It comes off no problem, and then you make next week's menu :) 
We have ours on a little easel-like stand sitting on top of our microwave in our Kitchen, and we like it quite a bit!


I did a couple other crafts yesterday, but I can't put them up yet because they're for Jimmie for Valentine's day.  So those wont be up for another couple of weeks :) Oh and if you're trying to understand what Wednesday says.. it says "CougarEat before play".  We're going to see a play for my drama class on Wednesday and we've got about 20 minutes between my class and the start of the play, so for those of you who don't know, CougarEat=eating on campus.  It's like BYU's food court.

Well now that it's written... time to get started making dinner!

Sunday, January 15, 2012

Cake Pops for Geoff's Birthday

Happy 24th Birthday to Geoff!

 We decided to give the Philly Phanatic a balloon :)

The idea for this banner is actually from the TV show The Office;
I didn't know if Geoff would remember that it was but either way, I knew he'd appreciate the humor in the lack of excitement and the formal tone that it takes. 

So this afternoon Geoff came over for birthday dinner and for desserts, I decided to try...

CAKE POPS.

So I thought I'd give some instructions and tips for those of you who have considered trying them out

Materials Needed: Cake Mix, Frosting, Candy Melts, Lollipop sticks.  Optional: Styrofoam, sprinkles, cream cheese

Step One: Bake a box cake as you normally would.

Step Two: Once it has cooled, break it up into crumbs.  I did this by cutting it into squares and scraping the pieces and crumbs back into the KitchenAid.  Then I mixed it on and off with the whisk attachment to break up the big pieces. 

Step Three: Once the pieces appeared to be relatively even, add frosting and mix until you get a good enough consistency to roll it into a ball.  You don't need too much, and unfortunately I don't even know the measurement of how much I used. 
Note: I've heard that you can add part cream cheese-part frosting to the mixture to make it not as overwhelmingly rich.  

Step Four: Using your hands, roll the cake mixture into even sized balls.  The cake mix that I used made about 35 cake pops.

Step Five: Melt the chocolate candy melts as instructed on bag

Step Six: Individually dip the end of the lollipop stick into the chocolate and then place insert into a cake ball.  You want the stick to be about 1/2-3/4 of the way through the ball.  As you can see from the picture, the chocolate will form a little ring of chocolate around the stick and the cake.  This helps the stick and the cake stick together better.

Step Seven: Dip each cake pop into the chocolate so that it is completely submerged.  You should have enough chocolate to be able to do this in one dip without having to scoop more on with a spoon or spin it around in the chocolate.  Adding too much chocolate from scooping, twisting, or turning will make it so that the cake will most likely fall off of the stick

...As you can see, I ignored this step the first time.  My solution?  Put the chocolate into a tall glass instead of a bowl so that you have more depth to work with.  Worked like a charm. 

Step Eight: After dipping the cake, lift from chocolate and gently tap the lollipop stick on the side of the glass, while slowly turning the stick.  This will allow for the excess chocolate to drain off and form an even coating.  

Step Nine: Once the extra chocolate is off you have 2 options.  For a more flawless and rounded finish, stick the end of the lollipop stick into the Styrofoam to allow to dry.  If you don't have Styrofoam, they can also dry laying down, but as you can guess, the wet chocolate will form a flat edge against that surface.

Step Ten: Adding sprinkles- If you choose to add sprinkles to your cake pops, you must do it at the right time.  
-Adding the decorations immediately after dipping will be too heavy for the wet chocolate and pull the coating down.  
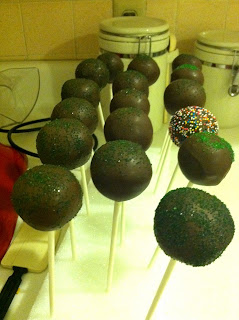
-Don't wait too long though because apparently the top hardens  first and you'll result in this balding look...

 -You need to wait until the chocolate coating is in between hardened and wet. This generally does not take too long.  Here's one that turned out pretty well.


The reason why most of these just have green sprinkles on them is because I decided to try Mint Chocolate dipping candy.  I wanted to be able to tell them apart from the super rich ones that I didn't care for quite that much.  The mint seemed to cut the richness down a bit and I'd suggest it for sure :)

Anyway, that's really all that I can think of on this for now.  If you have any questions, let me know! It was quite the experiment, pretty fun if I do say so myself! Give it a try :)

Saturday, January 7, 2012

Experimenting with Cookies

So one of our wedding gifts from the Sikahemas was the Wilton Cookie Pro Ultra II. I've been super excited to try it out but wasn't able to get it back to Utah until we came back from break.  We thought it was a pretty neat thing so we decided to take a video as we started forming our cookies.  It took some experimenting to get it right but I think they turned out pretty cool!  The cookie gun came with several recipes so the dough was a great consistency and tasted delicious!  I'm going to try the chocolate ones next time :) Here are some videos for y'all!


Here are some of the different shapes!


And they taste great too! :)

Match Game on Christmas Vacation

Well we made it through another semester!  Jimmie will be starting his job for Myler Disability on Monday and I started the Winter semester of my Junior year on Wednesday (the day we flew home from New Jersey!) We had a lot of fun with both sides of the family!

One of the things that I found especially fun was play Match Game with the fam. In the first round Jimmie was Gene Rayburn (the host).  Dad and I were contestants named Sir Isaac Newton and Helen Keller, respectively.  Our panelists were Nathan who played Nipsey, Megan who played Richard, Evan who was Yoda, and Mom who was Betty White.

Here's the basic run down of how you play this game.  Assign 1 person to be the host, 2 contestants, and as many panelists as you can.

Might I add, your host must be technologically inclined and have a computer :)  So that they can play this Intro Music as you GET READY TO MATCH THE STARS and introduce the panelists.

The game goes just as it does on the TV show.  To find the questions, we just Google "Match Game Questions" or "Match Game Sample Questions".  The host will read the question and then cue this think music so that the panelists can write down their answers on pieces of paper.  Once everyone has dinged in, the contestant gives the answer and the panelists reveal theirs, trying to match.  On the game show, the panelists drop their used answers into a slot after they've been given.  We play on these couches so that we can drop them in the slots in between the cushions and collect them from under the couch afterwards :)  We like authentic.

For the Bonus round where you try and get the top answer we turn to Google.  For example, you can pick any two word phrase or like name such as "Harriet _______" or "Star _____".  You type the first word on Google and the automatic drop down box will tell you the top 3 answers.  For example, when you type Star into Google (don't hit enter) the top 3 answers are (3) Star Wars, (2) Starfall, (1) Starbucks.  Some are better than others, so just think of words til you find a good one.

And that's how you play!  Sorry if that didn't make sense, but it's really all just a really fun work in progress.  Making up these game shows is better than any of the boxed versions you're gonna buy.  Have fun!  If you're still confused or feel up to watching the video of our family playing, let me know :)  I recorded our first round--it's hilarious, but kind of long.


Here are some pictures from Christmas and Christmas Eve


We took a ton of videos while we were out there but I thought this would be a funny one to share with the siblings.  Here is a video of Mom & Dad opening their combined gifts from the kids.

I thought it was a pretty hysterical reaction on Mom's part :)


If you don't want to watch the whole thing--Just skip to like 2:38

Thanks for a good year everyone!